AWS Lambda Functions written in Rust

AWS Lambda has recently announced the Runtime APIs and has open sourced a runtime for the Rust language that will allow us to use Rust to write our AWS Lambda Functions.
Let’s build an AWS Lambda Function!
We’re going to extend the basic example from the official repo and provide some tips to make it work with an API Gateway so we can consume our Lambda function from the Internet.
The code of the Lambda function that we’re going to build is here for you to take a look if you want to.
Creating the project
Let’s use cargo to build our project:
cargo new aws-lambda-rust
Once we have created the project, open the Cargo.toml file and make it look like this:
[package]
name = "aws-lambda-rust"
version = "0.1.0"
authors = ["You <[email protected]>"]
edition = "2018"
autobins = false

[[bin]]
name = "bootstrap"
path = "src/main.rs"

[dependencies]
lambda_runtime = "0.1"
serde = "1.0.80"
serde_derive = "1.0.80"
serde_json = "1.0.33"
The executable that we have to create needs to be called bootstrap. This is very important because if we don’t stick to this convention our Lambda function won’t work.
As you know, by default, Cargo will use the project’s name for the executable. One easy way to change this behavior is to use autobins = false and explicitely set the executable’s name and path in the bin section:
[[bin]]
name = "bootstrap"
path = "src/main.rs"
Writing our function
Open the main.rs file and use the code below. Note that this code is 2018 edition. Check out the comments to get a better understanding of what’s going on:
use lambda_runtime::{error::HandlerError, lambda};
use std::error::Error;
use serde_derive::{Serialize, Deserialize};

// Struct that will hold information of the request.
// When we use an API Gateway as a proxy, which is the default
// behaviour when we create it from the Lambda website, the request
// will have a specific format with many different parameters.
// We're only going to use `queryStringParameters` to check the
// query string parameters (normally for GET requests) and `body`
// to check for messages usually coming from POST requests.
#[derive(Deserialize, Clone)]
struct CustomEvent {
    // note that we're using serde to help us to change
    // the names of parameters accordingly to conventions.
    #[serde(rename = "queryStringParameters")]
    query_string_parameters: Option<QueryString>,
    body: Option<String>,
}

#[derive(Deserialize, Clone)]
struct QueryString {
    #[serde(rename = "firstName")]
    first_name: Option<String>,
}

#[derive(Deserialize, Clone)]
struct Body {
    #[serde(rename = "firstName")]
    first_name: Option<String>,
}

// Struct used for our function's response.
// Note again that we're using `serde`.
// It's also important to notice that you will need to explicitely
// inform these properties for our API Gateway to work.
// If you miss some of these properties you will likely get
// a 502 error.
#[derive(Serialize, Clone)]
struct CustomOutput {
    #[serde(rename = "isBase64Encoded")]
    is_base64_encoded: bool,
    #[serde(rename = "statusCode")]
    status_code: u16,
    body: String,
}

// Just a static method to help us build the `CustomOutput`.
impl CustomOutput {
    fn new(body: String) -> Self {
        CustomOutput {
            is_base64_encoded: false,
            status_code: 200,
            body,
        }
    }
}

// This is our function entry point.
// Note the use of the `lambda!` macro. It will hold our handler:
// pub type Handler<E, O> = fn(E, Context) -> Result<O, HandlerError>
fn main() -> Result<(), Box<dyn Error>> {
    lambda!(my_handler);
    Ok(())
}

// Our handler will just check for a query string parameter called `firstName`.
// Note the different behavior depending on the value of the parameter.
// In case there's no query string parameter, we'll check the body of the request.
// The body comes as a string so we'll have to use `Serde` again to deserialize it.
// Finally, if we have no body, we'll return a default response.
fn my_handler(e: CustomEvent, c: lambda_runtime::Context) -> Result<CustomOutput, HandlerError> {
    // checking the query string
    if let Some(q) = e.query_string_parameters {
        if let Some(first_name) = q.first_name {
            return match first_name.as_ref() {
                "" => Ok(CustomOutput::new(format!(
                    "Hello from Rust, my dear default user with empty parameter! (qs)"
                ))),
                "error" => Err(c.new_error("Empty first name (qs)")),
                _ => Ok(CustomOutput::new(format!(
                    "Hello from Rust, my dear {}! (qs)",
                    first_name
                ))),
            };
        }
    }

    // cheking the body
    if let Some(b) = e.body {
        let parsed_body: Result<Body, serde_json::Error> = serde_json::from_str(&b);
        if let Ok(result) = parsed_body {
            return match result.first_name.as_ref().map(|s| &s[..]) {
                Some("") => Ok(CustomOutput::new(format!(
                    "Hello from Rust, my dear default user with empty parameter! (body)"
                ))),
                Some("error") => Err(c.new_error("Empty first name (body)")),
                _ => Ok(CustomOutput::new(format!(
                    "Hello from Rust, my dear {}! (body)",
                    result.first_name.unwrap_or("".to_owned())
                ))),
            };
        }
    }

    Ok(CustomOutput {
        is_base64_encoded: false,
        status_code: 200,
        body: format!("Hello from Rust, my dear default user! No parameters"),
    })
}
Building our project
AWS Lambda will execute our function in an Amazon Linux Environment.
This means that we’ll have to add a new target called x86_64-unknown-linux-musl:
rustup target add x86_64-unknown-linux-musl
Now, depending on your operating system, you will have to do different things.
You’re using Linux
If you’re using Linux you just have to install the musl-tools:
sudo apt install musl-tools
You’re using Mac OSX
If you happen to be using Mac OSX you will need to add something more.
First, we’re going to install musl-cross using Homebrew, which will be our linker:
brew install filosottile/musl-cross/musl-cross
Then, we’re going to create a .cargo folder with some config file in it:
mkdir .cargo
echo '[target.x86_64-unknown-linux-musl]
linker = "x86_64-linux-musl-gcc"' > .cargo/config
Finally, in order to avoid some issues with the dependencies, make sure you create a symlink to the new linker:
ln -s /usr/local/bin/x86_64-linux-musl-gcc /usr/local/bin/musl-gcc
Common final step
So, provided that we have already everything set up, we are going to proceed to finally build our project by using Cargo:
cargo build --release --target x86_64-unknown-linux-musl
This will create an executable file called bootstrap in the ./target/x86_64-unknown-linux-musl/release directory.
Unfortunately, AWS Lambda expects the package to be deployed as a zip file, so one final step:
zip -j rust.zip ./target/x86_64-unknown-linux-musl/release/bootstrap
This will just create a rust.zip file in the root of our project.
Deploying the Function
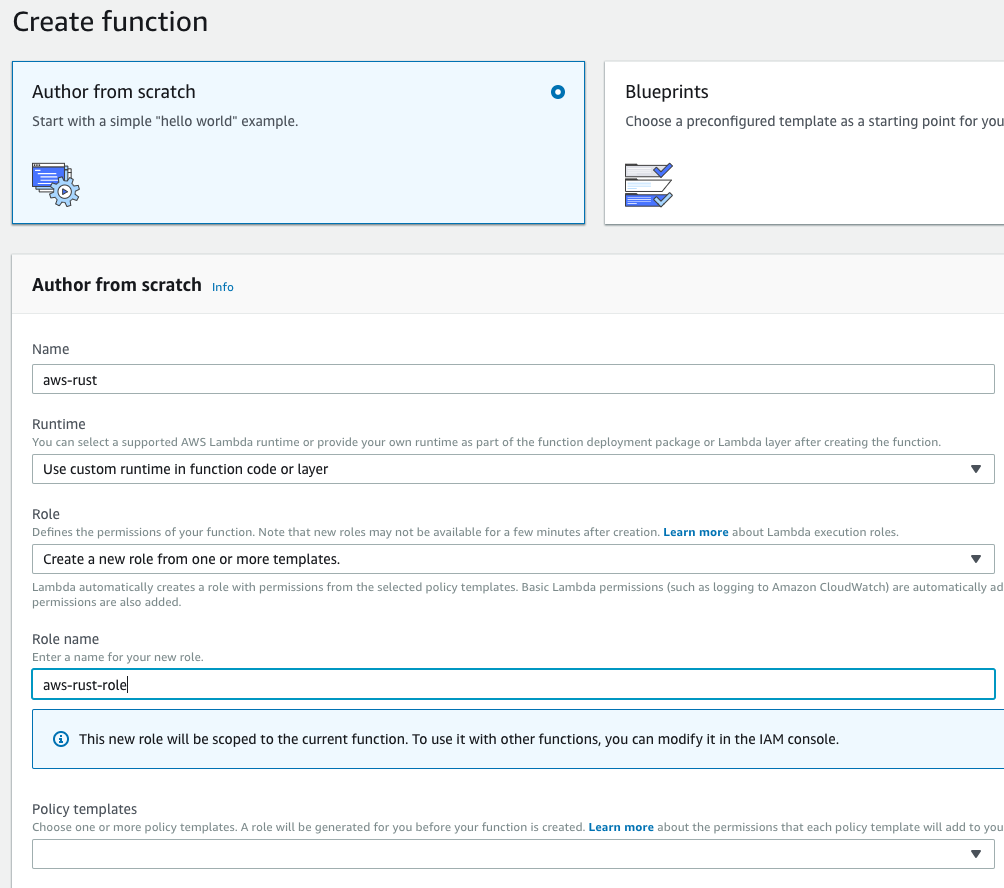
Let’s create a new function by browsing to the AWS Lambda console.
Once there, make sure your screen seems like the picture below and click create function:
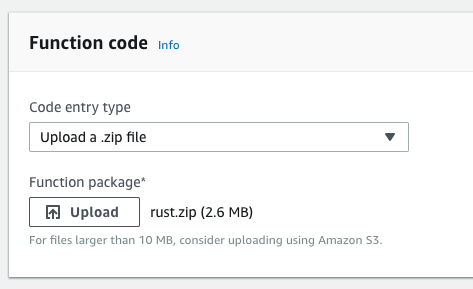
Then, in the Function code section, upload the .zip file and press the save button.
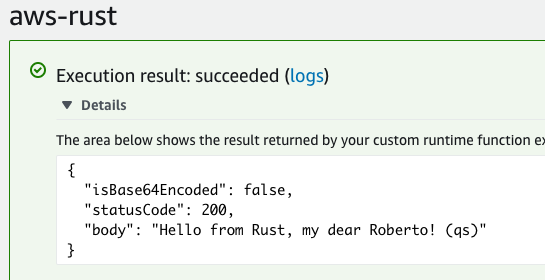
If you want, you can test your function. Just remember that we’re expecting an object like this:
{
  // query string params is an object
  "queryStringParameters": {
    "firstName": "Roberto"
  },
  // body always comes as a string
  "body": "{ \"firstName\": \"Rob\" }"
}
You should see something similar to this:
Exposing the function through an API Gateway
Now we’re going to create a new API Gateway so we can access our function from the Internet.
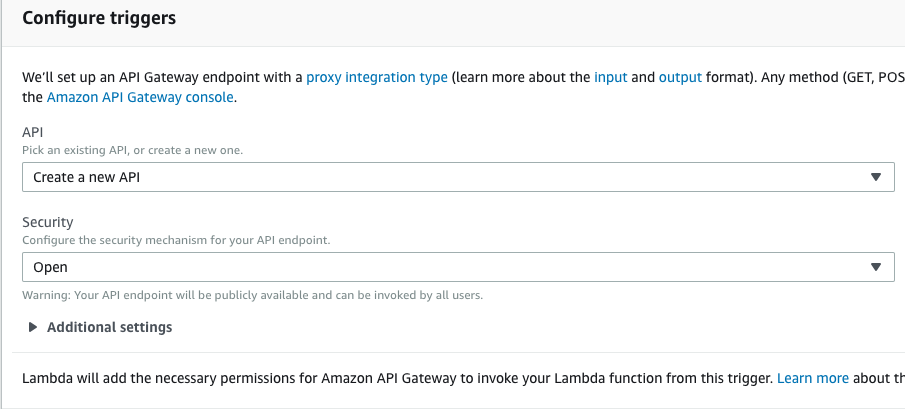
In the Add triggers section, select API Gateway.

Then configure the triggers like this, and click Add and Save:
You should be seeing something similar to the following picture:
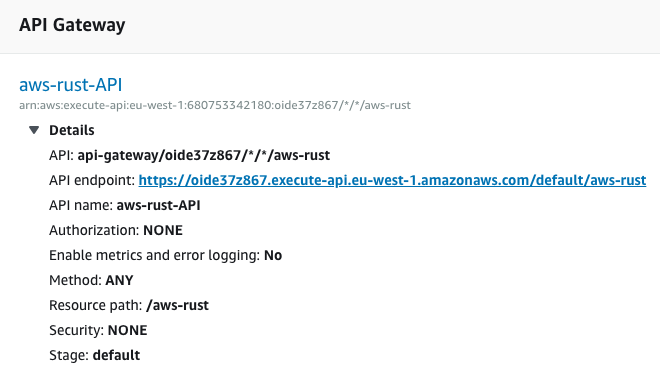
You can click over the name of your api (aws-rust-API in our example) and you will be redirected to the API Gateway configuration page. From there you should be able to re-test your API, do some mappings if needed and/or redeploy it.
You can also check that our API is working by browsing to this URL: https://oide37z867.execute-api.eu-west-1.amazonaws.com/default/aws-rust?firstName=READER
Conclusions
As you can see, it’s pretty simple to write an AWS Lambda Function using Rust. You don’t have any excuse now to not start using it for your serverless projects ![]() .
.
Remember that if you want to get access to the full code of this article you can browse to this repo.